If your Apple Watch battery doesn’t last as long between charges, you can replace it yourself or get professional service (usually for less than $100). Replacing the battery requires a plastic opening tool, a specific screwdriver set, and a clean, well-lit work area. Be careful not to damage other internal components, especially the fragile connector linking the battery to the electronics. Source replacement batteries responsibly, connect and secure the new battery following proper guidelines, and reassemble the watch in reverse order for water resistance.
Is It Worth Replacing the Battery Yourself?
Replacing your Apple Watch battery yourself can be a way to save some money, but it’s important to weigh the risks and consider your technical ability. Here’s what you should know before diving in.
Difficulty:Battery replacement on an Apple Watch is considered moderately difficult. Small components and delicate flex cables require careful handling.
Warranty:Opening your Apple Watch, even to replace the battery, will void any remaining warranty.
Risk of damage:If you’re not comfortable with delicate electronics, there’s a risk of damaging other components in your watch during the process.

Cost:While a replacement battery itself might be inexpensive, you’ll need specialized tools that can add to the overall cost.
If you decide to proceed, here’s what you’ll need:
1. Preparation
2. Opening the Watch
3. Removing the Old Battery
4. Installing the New Battery
5. Reassembly
Important Notes:
Preparing for Battery Replacement
When you replace the battery of an Apple Watch, it’s important to work safely and be well-prepared. Having the right tools and understanding the initial steps will set the stage for a successful replacement.
Safety Precautions
Before beginning, one should protect their eyes with safety glasses. Batteries can sometimes leak or puncture causing harm. Heat is often used to loosen adhesive during the replacement process. One must handle tools like heat guns or hair dryers with care to avoid burns.
Required Tools and Materials
To start, gather these essential tools:
Maintaining an organized workspace with these tools within reach will simplify the process.
Initial Steps
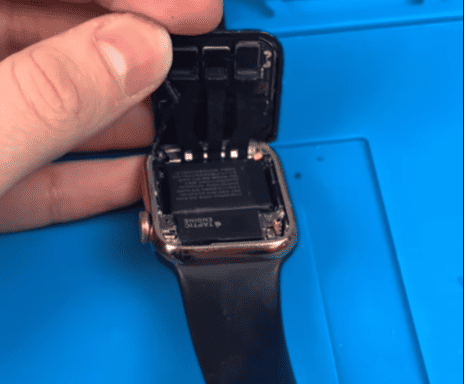
First, power down the Apple Watch to avoid short circuits. Apply heat around the edges of the watch face carefully to melt the adhesive. Using the opening pick, gently separate the screen from the case. Work slowly and use the prying tool as needed to keep components safe.
Remember, replacing a battery can be a delicate task, and following each step with attention will help protect the watch and ensure the battery is replaced correctly.
Battery Replacement Process
The process of changing an Apple Watch battery involves careful removal of the old battery and the precise installation of a new one. Testing ensures the watch runs as expected.
Removing the Battery
First, power off the watch. Next, gently heat the edges of the screen to weaken the adhesive. A careful approach helps protect the delicate display cables. Pry the battery out with a plastic tool. Always check for a swollen or deformed battery. In such cases, replace the battery to avoid damage to the motherboard.
Installing the New Battery
Connect the new battery using the original connector. This step needs a steady hand. Align the new battery and press firmly to secure it. GPS-only and Cellular/LTE versions follow similar steps. Apply replacement adhesive to ensure a firm hold.
Reassembly and Testing
Reattach the screen with the same caution used during removal. The battery connector bracket should be secure. Turn on the watch and check for signs of life. Look at the battery service menu to confirm the battery’s maximum capacity. A full test cycle will reveal any issues with battery drain.
This process requires patience and attention to detail for the best results.
Understanding DIY Apple Watch Battery Replacement
Replacing the battery in an Apple Watch might seem daunting, but it’s a task that a careful individual can complete with the right tools and instructions. An Apple Watch’s battery, like all rechargeable batteries, has a limited lifespan. A new battery can bring fresh life to the device.
Firstly,safetyis paramount. If a battery is swollen, it indicates a potential hazard, and one needs to take extra precautions.
It’s essential to understand that while DIY repair kits are available, the process requires patience and precision. Various models may differ slightly in battery replacement steps. Videos and detailed guides offer visual aid; however, one should take care not to rush and risk damaging their Apple Watch.
When replacing the battery, ensure the replacement part is compatible with the particular Apple Watch model. This can prevent potential issues post-repair. The benefit of a DIY approach includes saving on repair costs and time without needing to send the watch away for servicing. However, if one is not confident in their DIY skills, it may be best to seek professional assistance.
Identifying the Right Replacement Battery
Before embarking on a DIY Apple Watch battery replacement, it’s crucial to select the correct battery. This ensures compatibility and optimal performance of your timepiece after the change.
Compatibility with Apple Watch Models
For every Apple Watch model, there is a specific battery designed to work seamlessly with it. Using the wrong replacement battery could lead to poor performance or even damage. Here is how you can identify the right replacement battery:
To successfully identify which battery you need:
By attentively following these pointers, you can confidently select the right replacement battery to breathe new life into your Apple Watch.
Gathering Necessary Tools and Materials
Before attempting to replace the battery in an Apple Watch, it is important to have the correct tools and safety equipment at hand. This ensures the process goes smoothly and helps to avoid any potential damage to the device.
List of Tools Required
To proceed with the battery replacement for your Apple Watch, you’ll need the following items:
Safety Equipment
Safety should never be overlooked. Here’s what you need:
Initial Preparations Before Starting
Embarking on a DIY Apple Watch battery replacement requires careful planning and mindful setup. A successful outcome hinges on establishing a safe workspace and understanding the precautions necessary when handling a new battery.
Workspace Setup
Before diving into the battery replacement process, a clear and organized workspace is critical. Start by selecting a flat, clean surface in a well-lit area to avoid misplacing small components and to offer clear visibility. Have all the necessary tools at hand, such as opening picks, a spudger, tweezers, a small screwdriver, and, optionally, a new adhesive gasket.
Battery Precautions
Handling a battery, especially one from an intricate device like the Apple Watch, demands following specific safety guidelines. Before proceeding, make sure to power off the Apple Watch to reduce any risk of short-circuiting. It’s advised to handle the battery with care, avoiding puncturing or bending it to prevent potential damage or injury.
Following these steps thoroughly is essential for a smooth and safe battery replacement journey.
Opening the Apple Watch
Replacing the battery of an Apple Watch is a delicate process. One must carefully open the device to ensure no damage to the internal components. Precision and patience are crucial throughout the entire opening procedure.
Detaching the Watch Band
Note:Some bands may have additional latches or buttons.
Removing the Screen
First, make sure the Apple Watch is powered off. To gently lift the screen:
Caution:Do not force open the screen as it may damage the Force Touch sensor or the screen itself. If resistance is met, apply more heat to soften the adhesive.
Reminder:Keep track of all screws and parts removed to ensure a smooth reassembly process later.
Removing the Old Battery
When it’s time to change the battery in an Apple Watch, it’s crucial to remove the old one carefully to avoid any damage. Key steps include safely disconnecting the battery and using the right techniques to remove it from the adhesive that keeps it in place.
Disconnecting the Battery
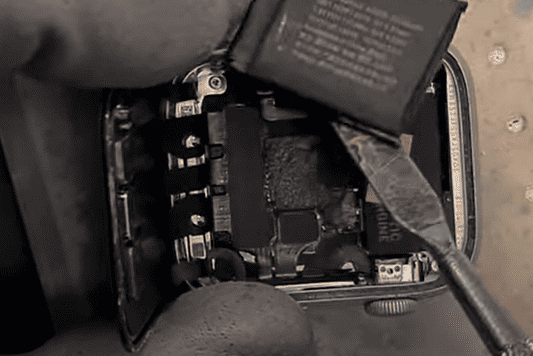
Before attempting to remove the Apple Watch battery, one must ensure it is properly disconnected to prevent shorting any components. They will need a set of small screwdrivers specifically designed for electronics. Using a tri-point screwdriver, the user gently unscrews the battery connector from the watch’s logic board. It’s essential to keep track of the screws due to their tiny size.
Battery Removal Tips
With the battery disconnected, attention turns to lifting it out. This process often involves dealing with old adhesive that secures the battery. A spudger or a similar plastic tool can be used to gently pry the battery away from its compartment. The user must be careful not to puncture or bend the battery, as this can be dangerous.
By following these specific steps, one can successfully remove the battery without damaging their Apple Watch, readying it for a fresh replacement.
Installing a new battery in an Apple Watch requires careful positioning and a steady hand. Precision is key to ensure longevity and functionality of your device post-repair.
Securing the Battery in Position
Once you have removed the old battery, it’s time to place the new battery into your Apple Watch. First, you need to prepare the new adhesive. This adhesive will keep the battery firmly in place. Peel off the backing on the adhesive and carefully align it within the battery compartment. Now, take the new battery and position it exactly where the old one was. It is crucial to ensure the battery is not misaligned as this can affect the watch’s performance.
Reassembly and Resealing
With the new battery secured, begin reassembling your Apple Watch in reverse order from which you took it apart. This usually involves reattaching any cables disconnected during the removal process and ensuring that they snap firmly back into place. Once everything is connected, reapply the watch screen. Make sure to align it correctly before pressing down to seal. It’s important for the resealing process to be done carefully to maintain the water resistance of the watch. If your kit came with a new adhesive gasket, use it to replace the old one to ensure the best seal.
Post-Installation Procedures
After installing a new battery in an Apple Watch, it’s important to ensure everything works as it should. This includes testing the watch’s functions and calibrating the battery for accurate performance.
Testing the Apple Watch
Once the battery has been replaced, power on the Apple Watch to test its functionality. He or she should check that the screen responds to touch and that apps open without delay. It’s important to verify that the watch is capable of connecting to its paired iPhone and that all features are operating smoothly.
Battery Calibration
Calibrating the new battery helps maintain its power and longevity. To begin, charge the Apple Watch to 100% without interruption. After that, he or she should use the watch until it shuts down due to a low battery. Finally, charge it uninterrupted to 100% again.
Calibrating the battery ensures the Apple Watch accurately reflects battery power, supporting optimal performance of apps and features. Remember, regular calibration can help maintain the watch’s battery health over time
Frequently Asked Questions
Replacing the battery in an Apple Watch can seem daunting, but with the right tools and guidance, it’s a task that you’re able to take on with confidence. Here we’ll cover some common questions to help you get started.
How do you replace the battery in an Apple Watch Series 7 yourself?
To replace the battery in an Apple Watch Series 7, carefully open the case, disconnect the old battery, and install the new one. It’s critical to handle the components with care to avoid damage.
What is the average cost associated with DIY battery replacement for various Apple Watch models?
The cost for DIY battery replacement varies based on the model but typically includes the price of the replacement battery and any tools you may need to purchase, usually ranging from $20 to $70.
Where can I get a battery replacement for my Apple Watch?
Battery replacements can be obtained through Apple Support or a certified repair shop. Owners should ensure the service provider is reputable to avoid further issues.
How much is typically charged for an Apple Watch battery replacement?
The cost for an Apple Watch battery replacement varies. If out of warranty, Apple charges a fee unless covered by AppleCare+. Price details are available on the Apple website or by inquiring with Apple Support.
What are the indications that my Apple Watch battery may need to be replaced?
Signs that a replacement is needed include reduced battery life, the battery not holding a charge, or physical changes like swelling.
Is it cost-effective to replace the battery of an Apple Watch?
It can be cost-effective if the watch is relatively new and the cost is lower than purchasing a new device. The decision depends on the watch model and its condition.
What steps should be taken to replace the battery in an Apple Watch Series 5?
Replacing the battery in an Apple Watch Series 5 follows a similar process to the Series 3. After ensuring the watch is powered down, the screen is carefully removed to access the battery, which is then replaced with caution. It’s a sensitive process and might be best handled by a professional.
